First create a graphic for your Welcome page. I use PowerPoint for almost all of my graphic design. It's not something many people think to use, but it's what works for me - without shelling out a bunch of money for an actual graphic design program.
Once you have your graphic or logo made, resize it to around 500-550 pixels wide. I use Picassa for this. To resize in Picassa, I just export my picture and choose the size I want. Remember the dimensions, you'll need them later.
In order to post a picture on the welcome tab, it has to be hosted somewhere else. My host of choice is Photobucket. It's free and easy to use.
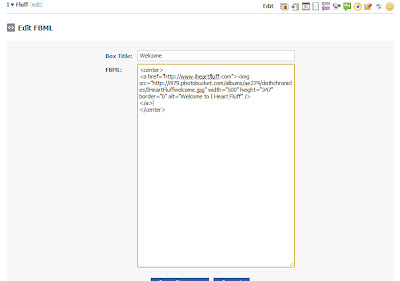
Now go to your Facebook page. Click on Edit and go to Apps. In Apps, find the FBML app and click on 'go to app'. If you already have a FBML tab set up for something else and you'd like to set up a second tab, just go to that app, scroll down and click on Create new FBML.
If you just want the picture without any links, all you need to do is copy the HTML Code from your picture on Photobucket and then paste it in the FBML box. I always like to have everything centered, so you can type the code like this:
<center>
Your HTML code would go here
</center>
If you want to get a little fancier, you can add a link to your welcome page. This is really useful if you want the page to direct people to your website. In order to do this, you'll need to copy the direct link to your picture instead of the HTML code this time.
Your code would look like this -
<center>
<center>
<a href="http://www.iheartfluff.com"><img src="http://i979.photobucket.com/albums/ae274/clothchronicles/IHeartFluffwelcome.jpg" width="500" height="347" border="0" alt="Welcome to I Heart Fluff" />
</a>
</center>
Just replace the text in red with the link you'd like your welcome page to be directed to, the text in yellow with your picture's direct link, and the text in green with your alternate text (this is the text that appears if your picture isn't showing for some reason).
Remember when I said to remember the dimensions for your picture? This is where you need them. Make sure to adjust the width and height for your image.
And that's it. As I've said before, there is a reason I'm not a teacher. So if you are completely confused, please leave a comment and I'll try my best to help.


Well I tried to do this and I can only get the default link/message to show up, not my picture. It's in photobucket. It's saved as a JPG. It's dimensions are 500 x 357
ReplyDeleteAny suggestions?
Allison
Try copying just the direct link to your image in photobucket and use this code:
ReplyDelete< center>
< img src="direct link to your photo goes here">< /img>
< /center>
Take the spaces out after the < (blogger won't let me post them without the spaces there)
Let me know if that works for you.